A long tutorial can contain several useful ideas, but each one needs a clear beginning and ending before it works as a short. For a business owner, educator or creator, finding those moments and preparing them for different platforms is often the time-consuming part of repurposing a video.
In this tutorial, we use Klap to turn an existing YouTube tutorial into vertical clips, review the results, schedule a selected clip across social accounts and verify a post on TikTok. We then retrieve the same work in ChatGPT and use a separate Klap MCP connection to manage scheduled posts. The aim is a repeatable workflow that keeps you in control of what gets published.
Before you start
Have a video you own or have permission to repurpose, a Klap account, and access to any social accounts you want to publish to. Connecting social accounts is useful for scheduling, but you can also work toward a downloaded clip. The ChatGPT portion is optional; the website workflow stands on its own.
Choose a source with a useful spoken explanation. Klap’s current documentation says clip selection is driven by speech and the timestamped transcript. That makes a webinar, interview or narrated tutorial a more suitable starting point than a silent montage. See how Klap works.
1 Connect the social accounts you want to use
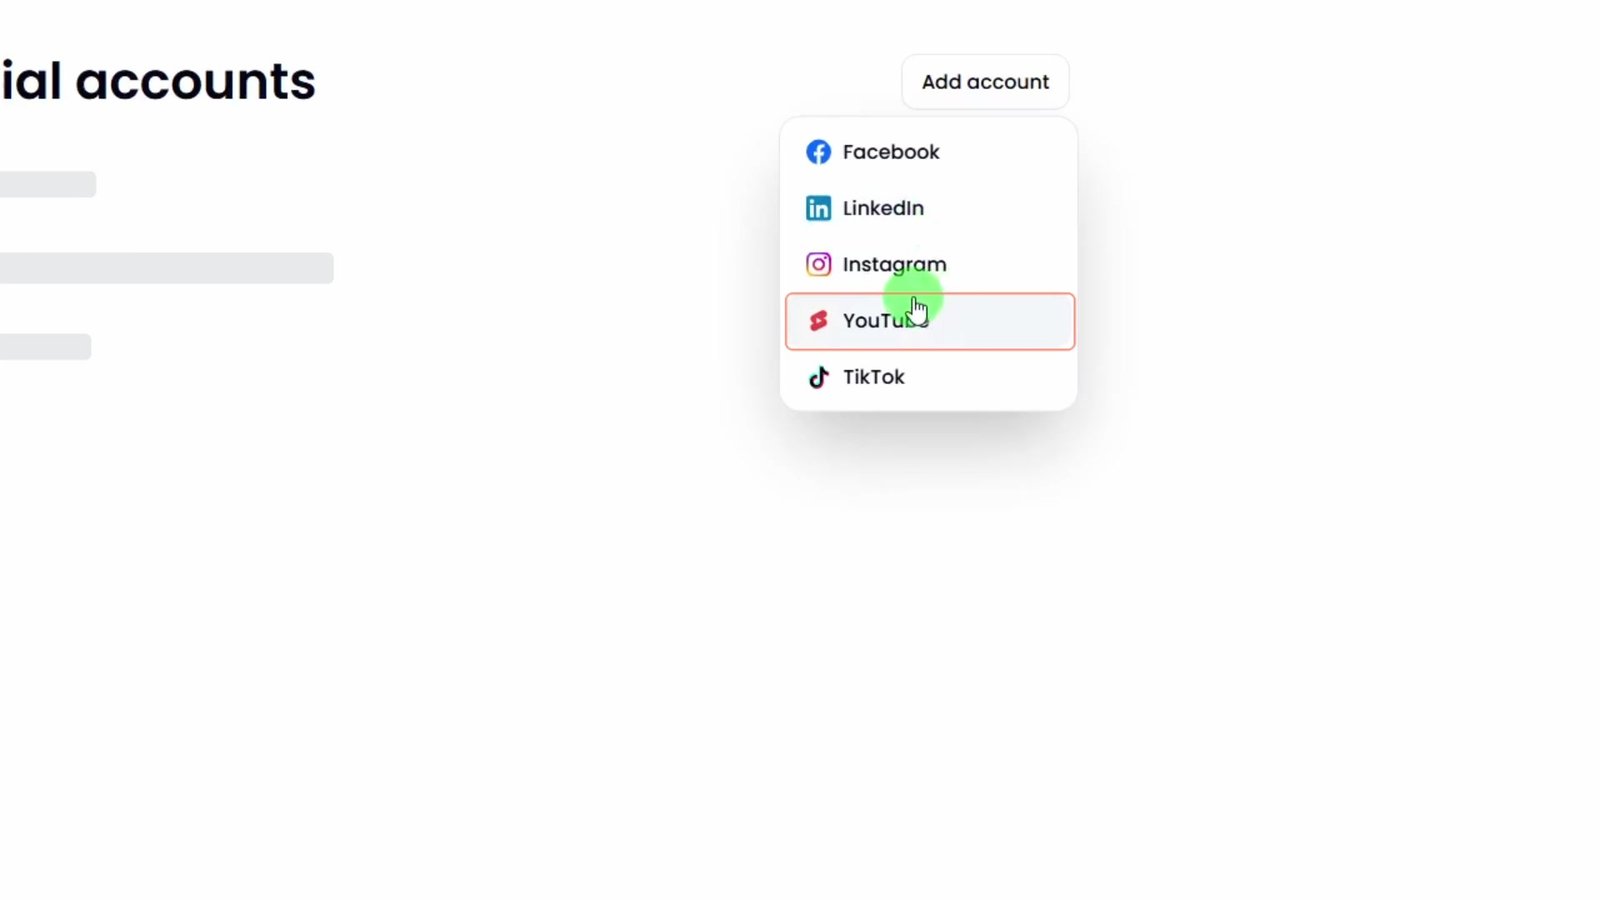
In Klap, open your profile menu and choose Social accounts. Select Add account, choose a platform and complete its connection flow. In the recording, YouTube, LinkedIn and Instagram are already connected, and TikTok is added next. The menu also offers Facebook.
Check the account handle before continuing, especially if you manage both personal and business profiles. Later, the scheduling screen can create separate posts for several connected accounts. Connecting the right account now prevents a much harder correction after publication.
2 Add your source video and choose a caption style
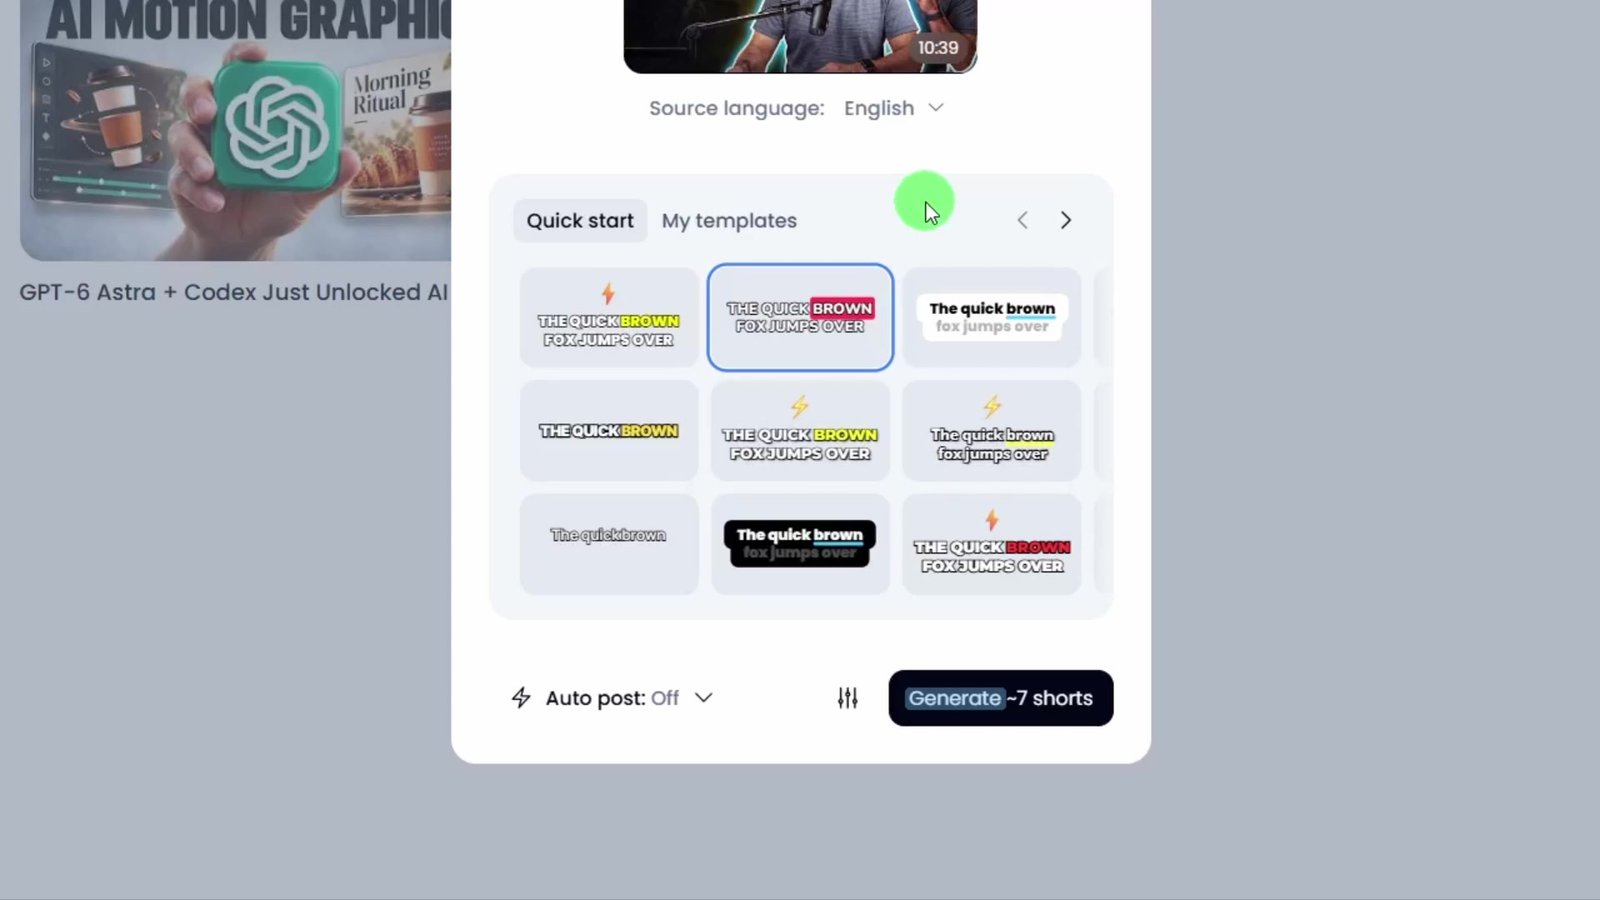
Open Videos and paste the link to the long video, or use Upload file for a local recording. The demonstration uses an existing AI avatar tutorial from the channel. When Klap recognizes it, the Create shorts panel displays the source preview and caption templates.
Choose a style from Quick start, or use My templates if you already have a saved design. The video browses the supplied templates rather than building a custom one. Pick a style that stays readable over your footage; a caption that looks attractive in a sample can still cover a product or an important control in the actual clip.
Leave Auto post off for this first pass, as shown in the tutorial. You will review the generated clips before deciding which ones deserve a place in your posting schedule.
3 Set the clip format and generate the first batch
Open the settings control beside the generation button. The demonstrated settings are Moments: Best; Shorts length: Auto; Aspect ratio: 9:16; Captions: on; and Intro title: on. The source language shown is English.
Best lets Klap choose moments without a narrower theme. The menu also offers options such as key takeaways or surprising facts, and a field for your own description. For a different source, you could ask for a specific customer question or lesson. That is a suggested variation, not an input used in this recording.
Auto leaves the length decision to Klap. The demonstrated menu also offers under 30 seconds, 30–60 seconds and 1–2 minutes. Choose a shorter range when your idea is simple, but avoid cutting an explanation so tightly that its meaning depends on the original video. The 9:16 setting prepares a vertical frame; it does not remove the need to check what the crop leaves visible.
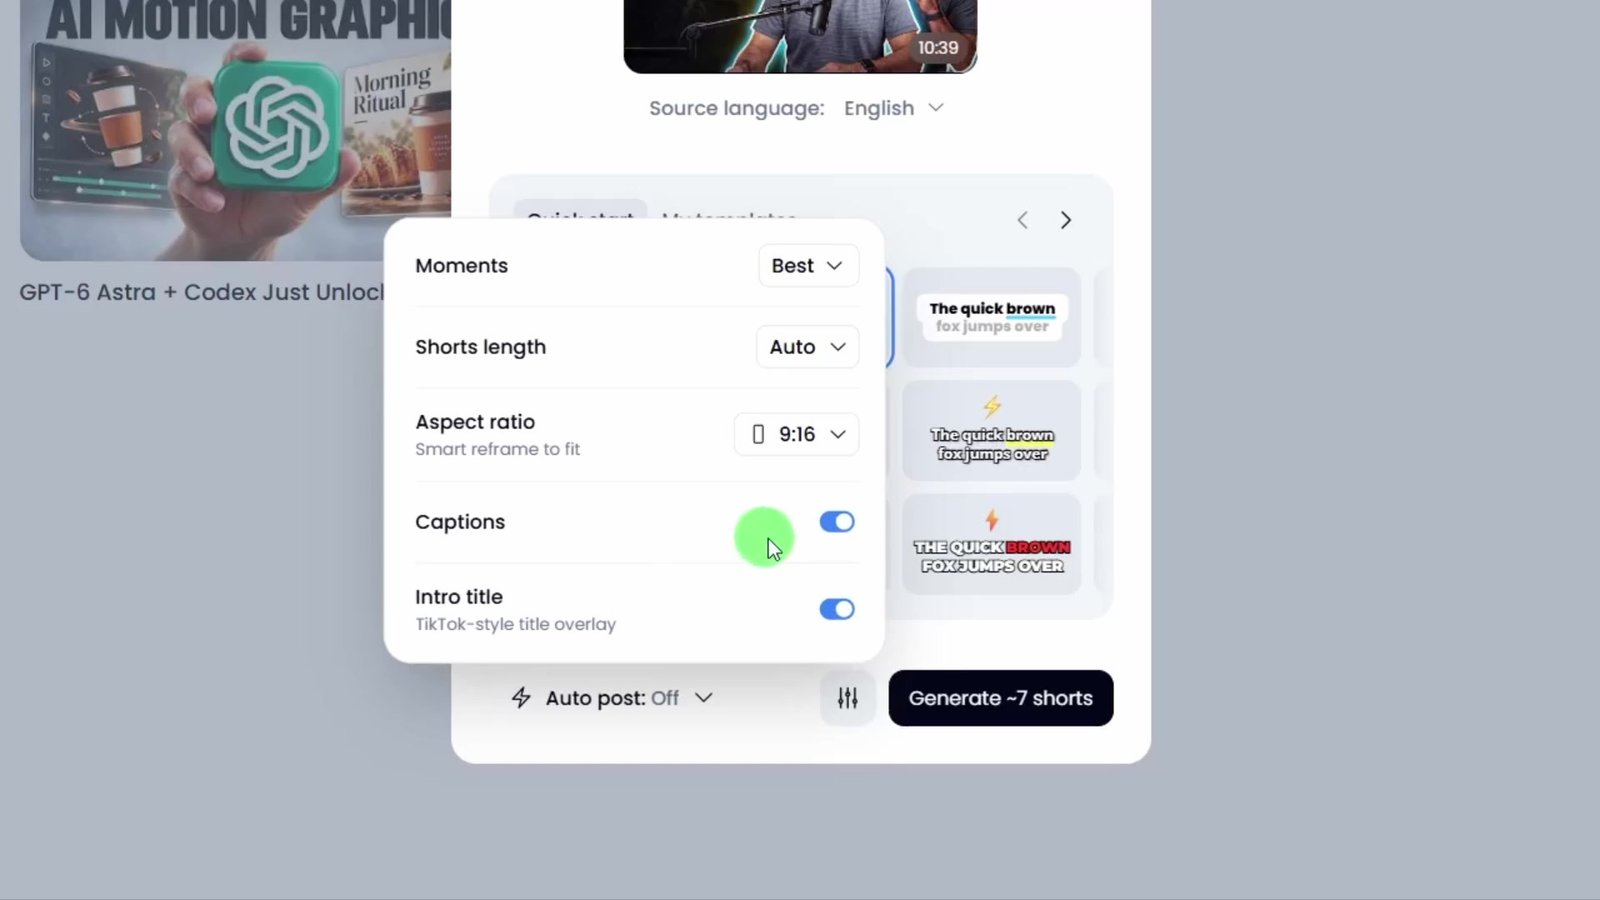
Select Generate. In this recording, the button estimates approximately seven shorts. The completed results show five generated shorts, with two additional candidates available to create. Treat the initial number as an estimate rather than a promise of seven finished clips. You can leave processing running and return when the results are ready.
4 Review the clips before exporting or scheduling
The results page shows a preview, title, length, virality score and transcript for each generated short. The first example is a 21-second clip titled “AI avatar built an entire ad with no camera or studio,” with a score of 85/100. Play the clip, then read its transcript to check that the short tells a complete, accurate story.
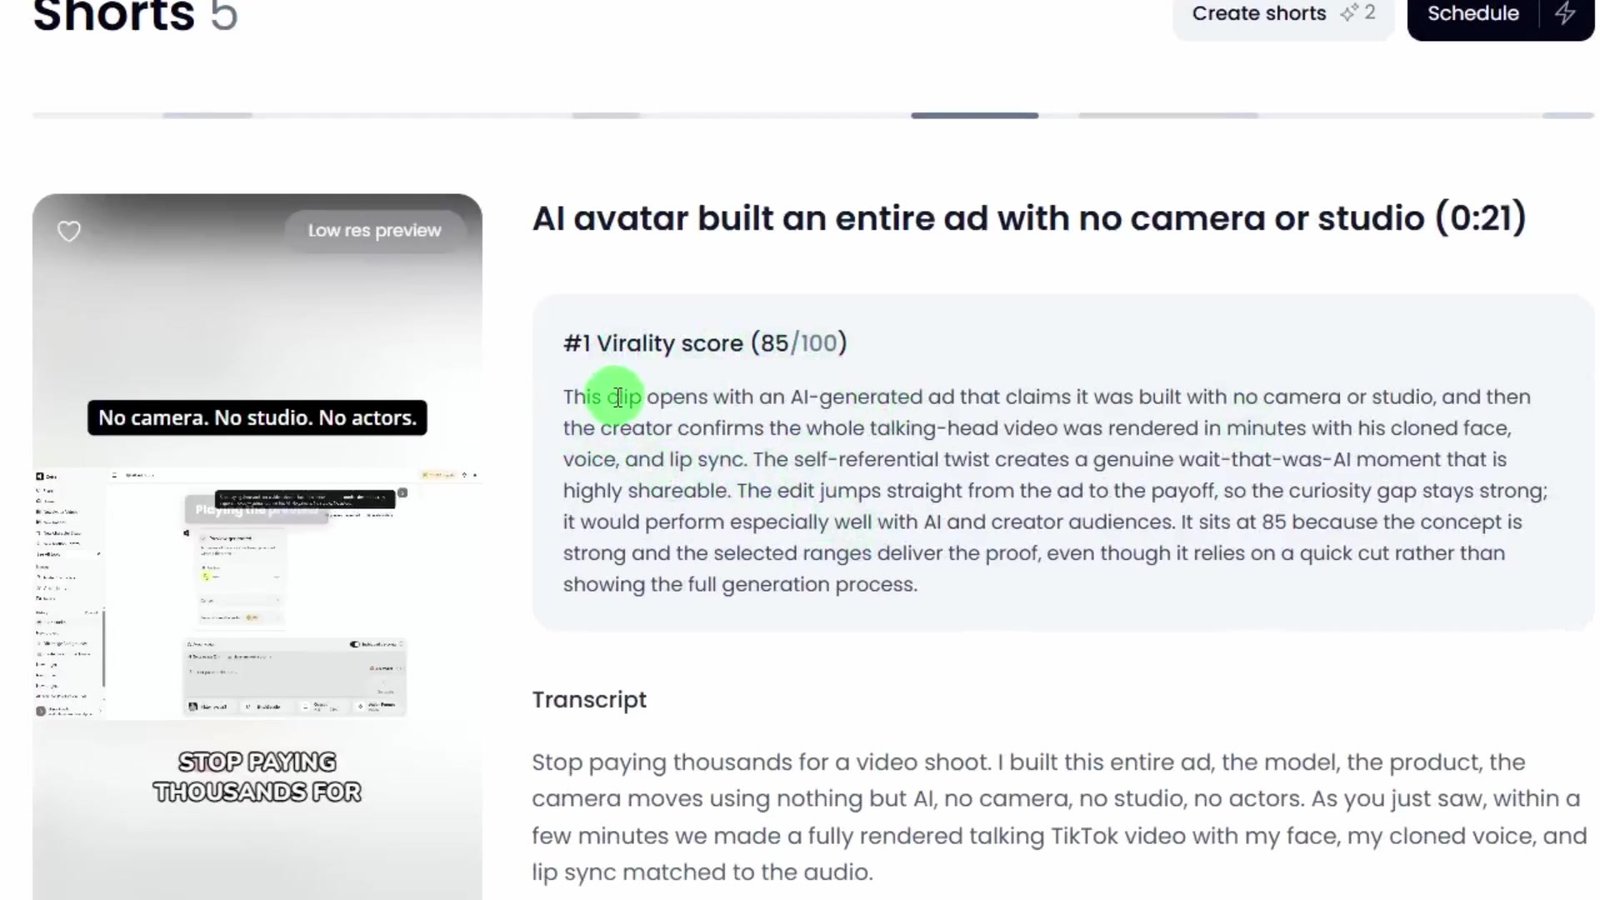
Use the score to prioritize review, not as a prediction of guaranteed views. Check whether the opening makes sense to a new viewer, whether the final sentence resolves the idea, and whether the edit changes the meaning of the speaker’s words. Also check names, numbers, captions and any claims that need context.
Pay particular attention to screen recordings. A vertical crop may preserve the speaker while making a software interface difficult to read. Klap’s documentation describes layouts for screens and slides, along with editable crops and captions. If an important setting is too small or missing, open the editor and adjust the framing rather than accepting the first result. This is additional documented guidance; the recording shows the Edit control but does not demonstrate a detailed editing session. Klap’s editing and reframing overview.
Use the download control when you want a rendered file. The recording shows Klap rendering the clip before the download completes. The three-dot menu also offers Rename and Delete. Deleting a clip is different from removing it from a scheduling queue, so check which screen you are on before confirming.
5 Build a small posting queue first
Select Schedule from the results, choose the clips you want and continue to scheduling. The demonstration initially selects all five shorts, then removes four from the scheduling queue so it can work with one. Those four remain in the project; they are not deleted as generated clips.
Now choose the destination accounts and review the frequency, time and starting date. The recording shows per-account frequency choices, including three or five posts per week, one or two per day, and a custom option. These controls help distribute a batch, but your first test can be just one clip on one account.
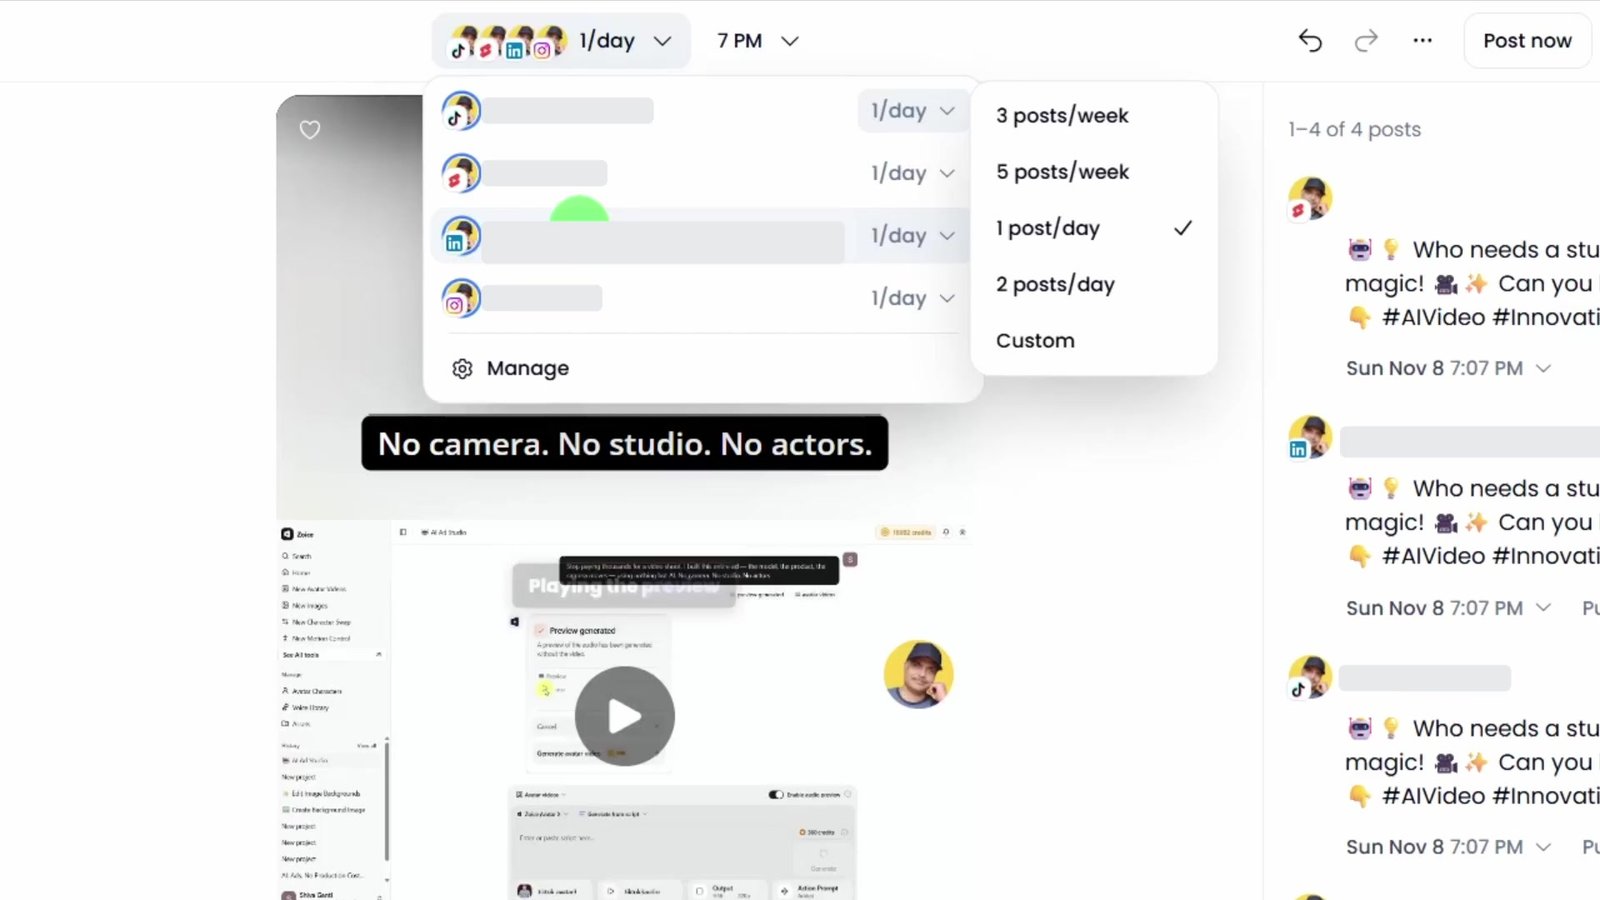
Review each post’s text and platform-specific options before confirming. In the video, the YouTube entry has a description field. Check the actual date, time zone, audience or visibility setting, and account on the final review screen. Do not copy the tutorial’s historical Monday date into your own schedule.
The demonstration confirms four scheduled posts for the one selected clip. That count represents destinations, not four newly generated videos. Open Calendar afterward and verify the entries. The tutorial also demonstrates deleting the LinkedIn scheduled post and posting the TikTok entry immediately.
If a connected account stops working, reconnect it in Klap before trying to post again. Klap’s official scheduling documentation distinguishes disconnected accounts from other scheduling failures and says scheduled posts can be reviewed and changed in the calendar. A scheduling confirmation should still be followed by a check of the eventual platform result. Klap social posting documentation.
6 Verify the result on the destination platform
For an immediate post, open the scheduled entry’s menu, select Post now and review the confirmation. Allow time for processing, then open the destination account and refresh it. The recording follows that sequence and shows the new short appearing on the TikTok profile.
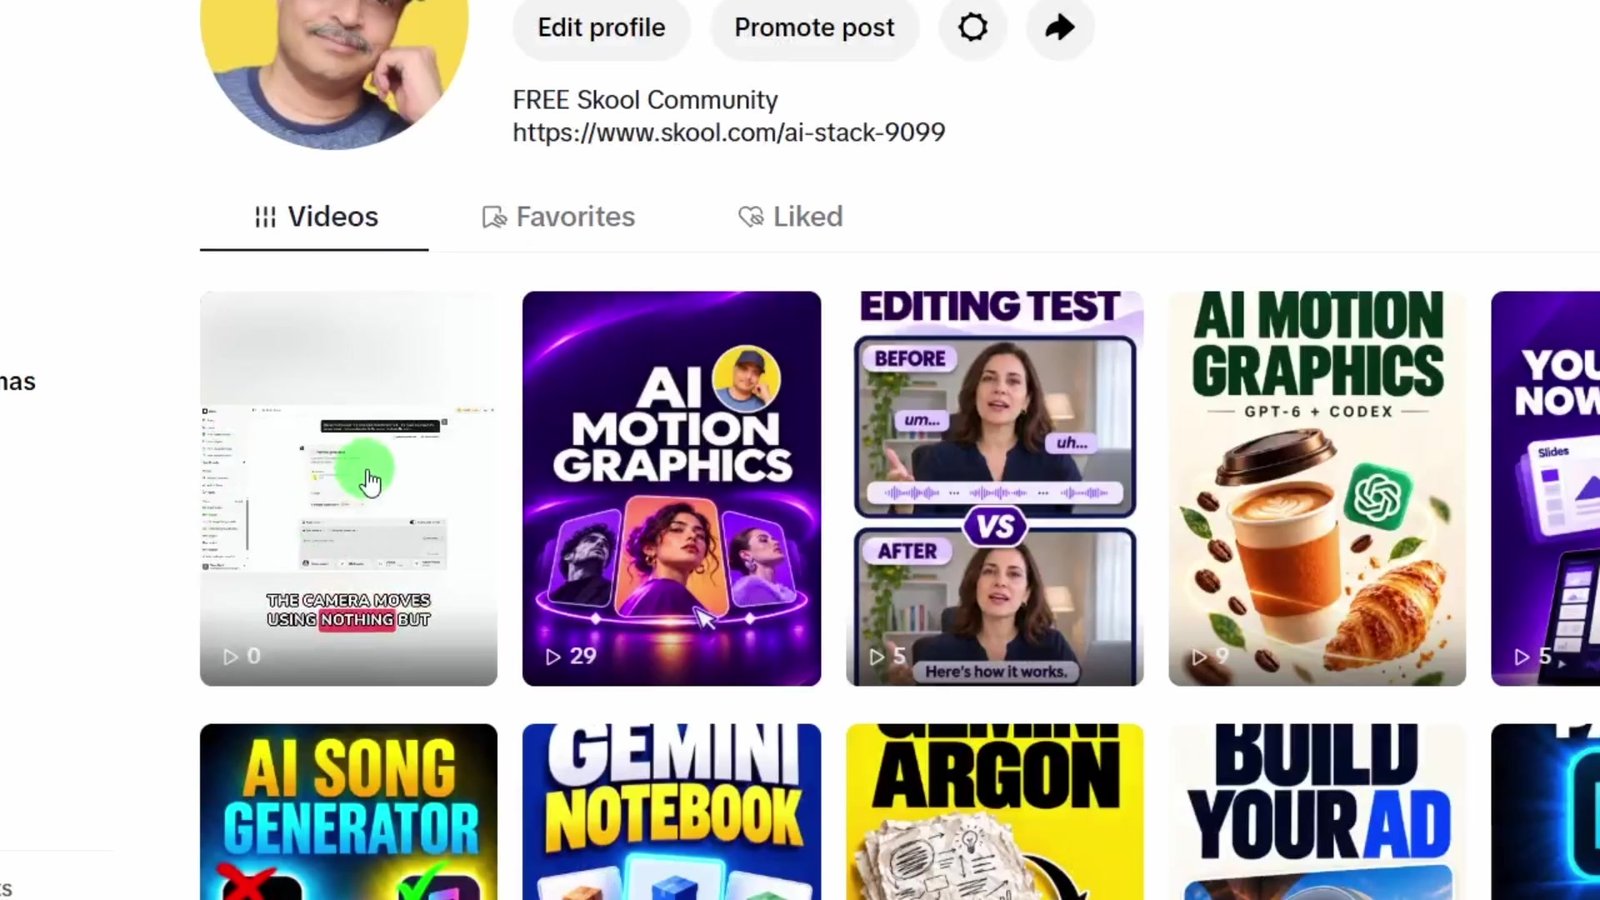
This final check matters because a queued or accepted post is not the same as a visible result. Play the posted version where possible, confirm that it reached the intended account, and check the caption and framing. If something is missing, inspect the existing scheduled or failed entry before creating another post; otherwise you can end up with duplicates.
7 Retrieve the same clips in ChatGPT
The second part of the tutorial uses Klap inside ChatGPT. In the recorded interface, open Plugins, search for Klap and add it. Connect your Klap account if prompted. Select the Klap connection in the conversation before making a request. The exact menus can differ between clients and versions; Klap’s current instructions also describe an app-directory connection. Official Klap connection guide.
Start by asking “list the tools you have access to.” In the demonstration, the standard connection reports seven tools. Then ask “list projects” and “get clips” for the existing project. The important part is reusing the completed work instead of asking for another batch of shorts.
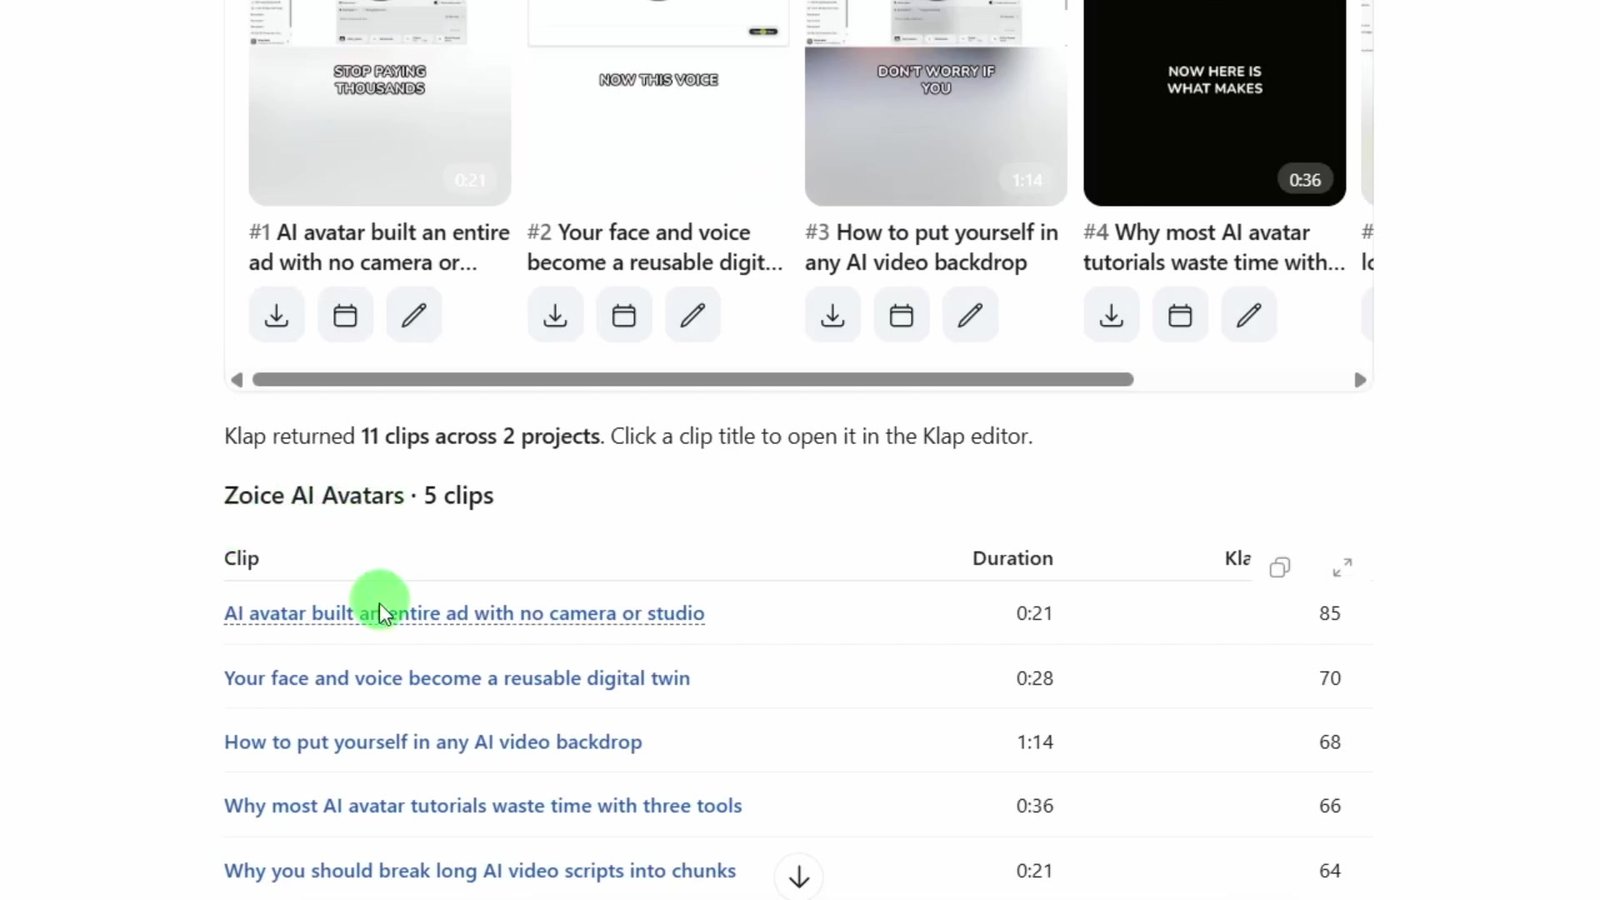
For your own account, a clearer suggested prompt is: “List my Klap projects, then get the clips from [project name]. Do not generate any new clips.” Replace the project name before sending it. If several projects look similar, confirm the source video before exporting or scheduling anything.
Retrieval is useful when you want to compare titles and durations or decide what to repurpose next without searching through the website. It also keeps the conversation tied to actual clip results rather than an assistant’s suggestions about what could be made.
8 Add the fuller MCP connection only when you need it
The recording then asks the standard connection to list scheduled posts. It reports that the required tool is unavailable. Instead of assuming every connection has the same capabilities, the tutorial adds Klap’s separate MCP server and checks the available tools again.
In the recorded custom-server form, the name is Klap Custom, the description is Developer tools access, the server URL is https://api.klap.app/mcp/agents, and authentication is OAuth. The name and description are labels chosen in the tutorial; the server address and authentication method are the connection details that matter.
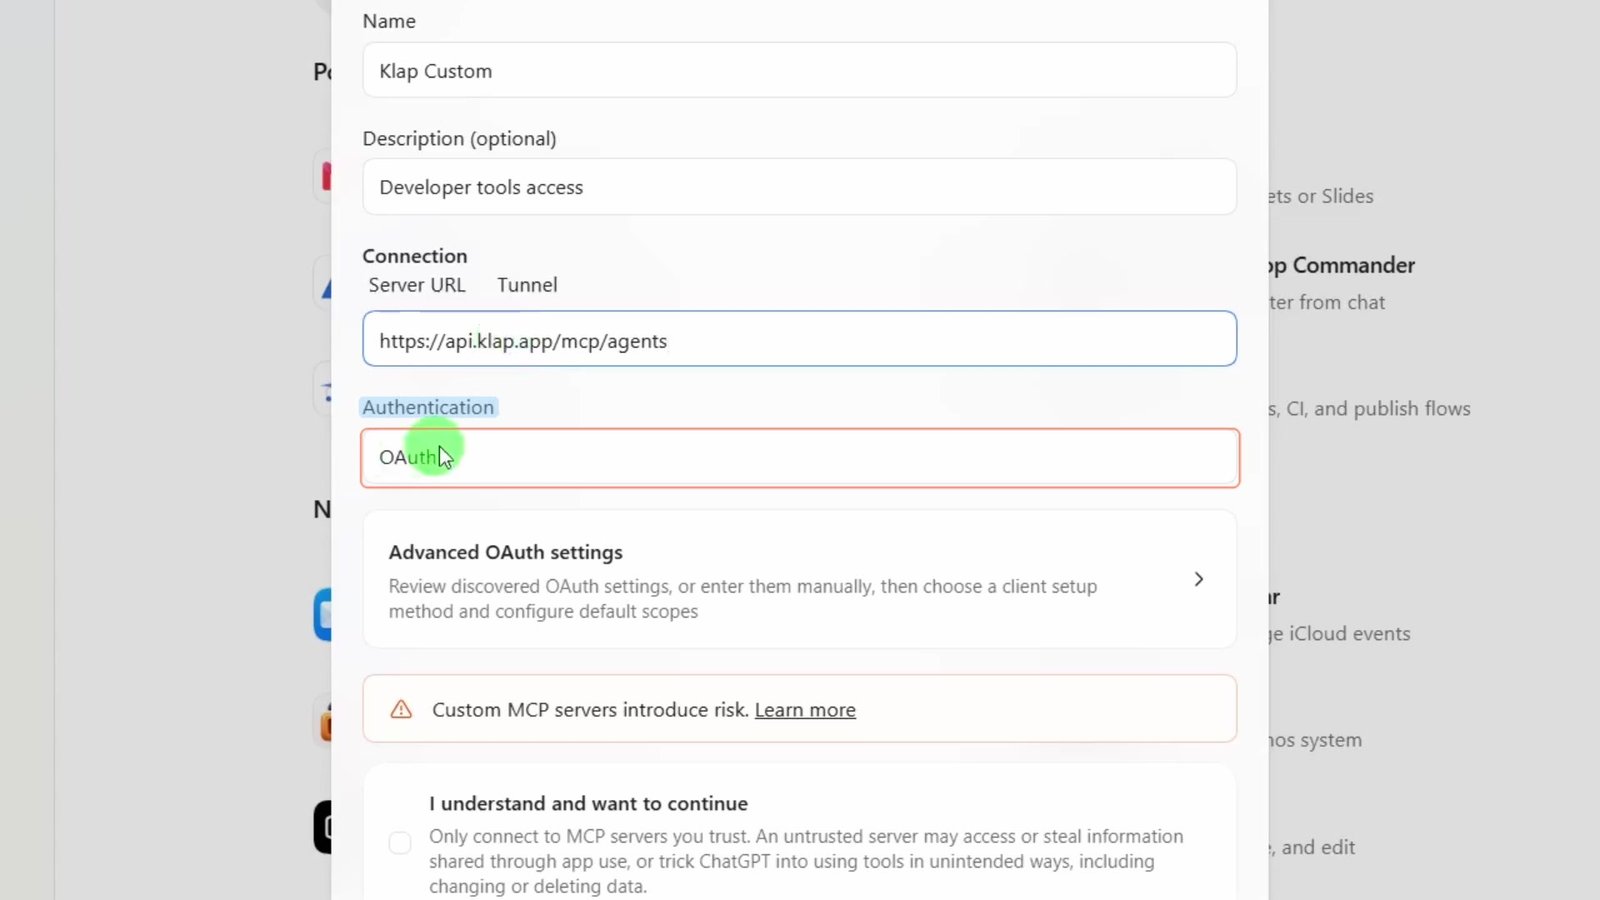
Review the custom-server warning and requested access before completing the connection. Use the official Klap endpoint, sign in to the intended account and authorize only a connection you trust. Availability and setup steps depend on your client and account. Klap’s current guide describes the fuller server as a set of 18 tools and distinguishes it from the standard app. Klap MCP setup and tool reference.
After connecting, select Klap Custom and ask “list available tools.” In the recording it reports 18, including tools for listing and cancelling scheduled posts. Ask “list scheduled posts” next. The response shows the remaining Instagram and YouTube entries, which are checked against Klap’s calendar.
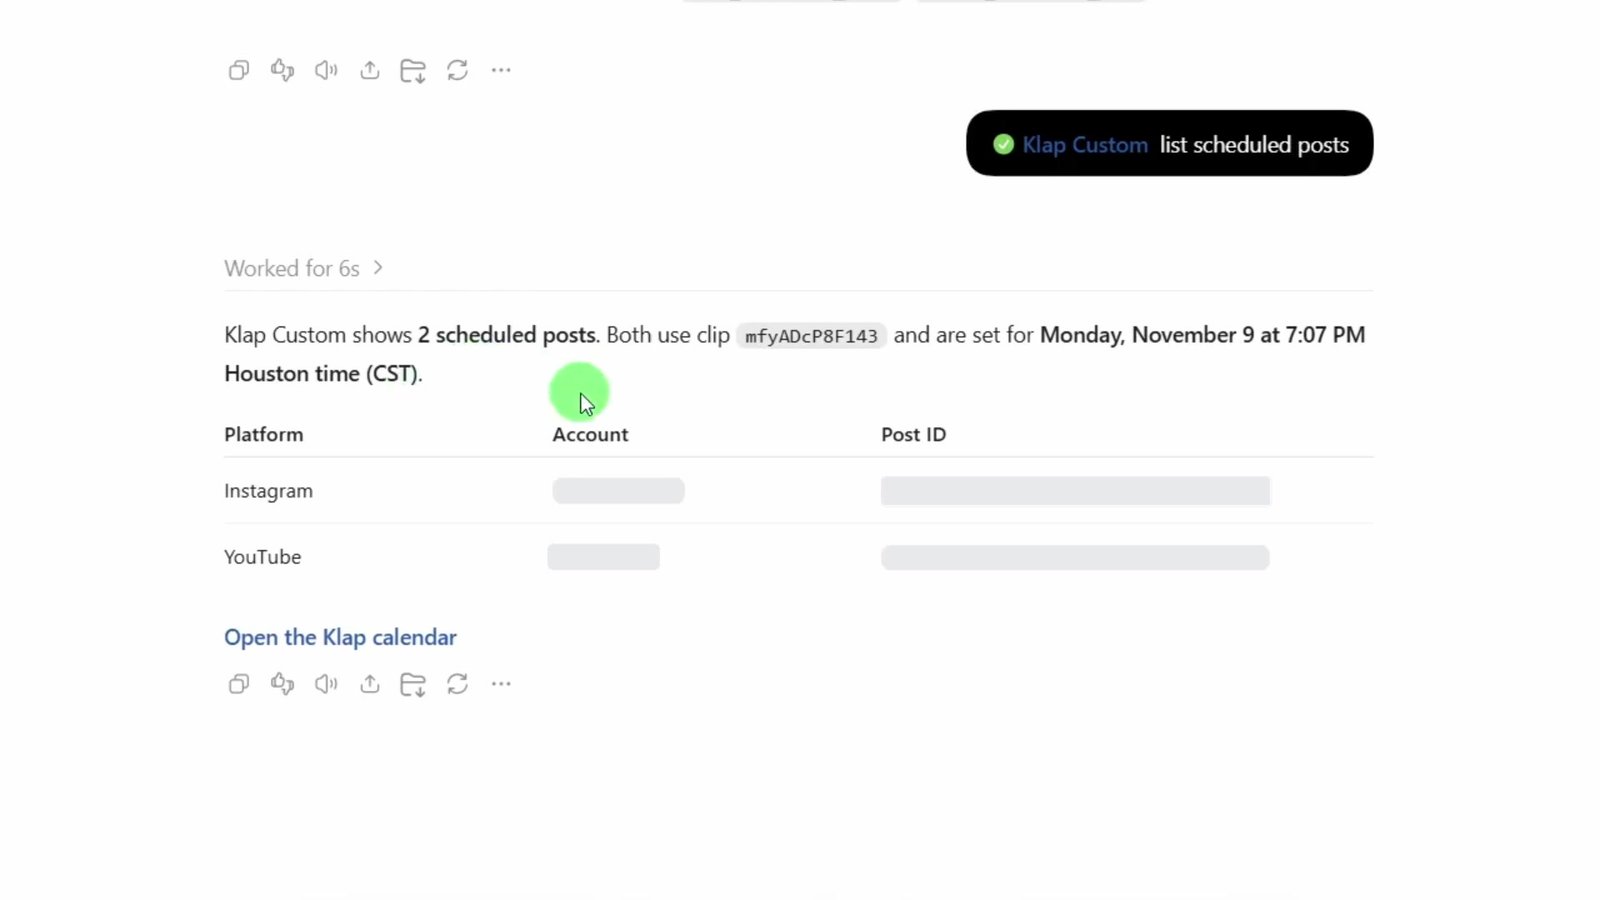
The tutorial then requests cancellation of the Instagram scheduled post and verifies that only YouTube remains in the calendar. When adapting this step, identify the exact clip, destination and scheduled time, especially if you have multiple Instagram posts. Ask to inspect the matches first when there is any ambiguity.
A useful next step beyond the recording
The fuller connection also supports timestamped transcripts, caption drafting and creating a clip from a description or a time range. These are documented possibilities, not additional workflows completed in this tutorial. A practical next request is: “Read the transcript of [project name] and suggest three standalone moments. Do not create or publish anything yet.” Review the suggestions before choosing a new cut. Klap MCP capabilities.
Keep the review step in your workflow
Start with one useful source video, generate a manageable batch, review the strongest clips and test a small posting queue. Once that works, you can reuse the same projects through ChatGPT and add the fuller connection when a specific task needs it. The time saved comes from finding and preparing candidates more quickly, while you still choose the message, the destination and the final version people see. Start your first project with Klap (affiliate link).